To delete rows in Excel using VBA, use the `Rows` property and the `Delete` method. For example, `Rows(“1:3”).Delete` deletes rows 1 to 3.
Excel VBA (Visual Basic for Applications) enables users to automate repetitive tasks and enhance spreadsheet functionality. Deleting rows using VBA can streamline data cleaning and management processes. This is particularly useful in large datasets where manual deletion is time-consuming. With VBA, users can target specific rows based on criteria, ensuring precise data handling.
Understanding how to use VBA for such tasks can significantly improve productivity and accuracy. This guide will provide a detailed, step-by-step approach to deleting rows in Excel using VBA, making it accessible even for beginners.
Credit: www.educba.com
Setting Up Vba Environment
Before you can delete rows in Excel using VBA, you need to set up the VBA environment. This involves accessing the Developer tab and enabling macros. This process ensures you have the tools and permissions needed to run VBA code.
Accessing The Developer Tab
First, open Excel and go to the File menu. Select Options from the list. A new window will appear.
In the Excel Options window, click on Customize Ribbon. On the right side, you’ll see a list of tabs. Check the box next to Developer. Click OK to save your settings.
Now, you will see the Developer tab in the Excel ribbon. This tab gives you access to VBA tools and options.
Enabling Macros
Next, you need to enable macros. Go back to the File menu and select Options again. This time, click on Trust Center in the left pane.
Click on the Trust Center Settings button. A new window will open. In this window, select Macro Settings from the left side.
Choose the option Enable all macros. This option allows you to run VBA code. Click OK to close the Trust Center window and then click OK again to close the Excel Options window.
With macros enabled, you are now ready to start writing and running VBA code in Excel.
Basics Of Vba Code
Excel’s Visual Basic for Applications (VBA) enables users to automate tasks. Deleting rows using VBA can save time and reduce errors. You need to understand basic VBA syntax and common functions.
Understanding Vba Syntax
VBA syntax is the set of rules that define the structure of VBA statements. Each statement in VBA performs a specific task.
Here is a simple VBA code to delete a row:
Sub DeleteRow()
    Rows(3).Delete
End Sub
This code deletes the third row in the active worksheet. The Sub keyword defines a new subroutine. The Rows(3).Delete command deletes the specified row.
Common Functions And Commands
VBA has various functions and commands to manipulate rows. Below are some essential commands:
- Rows(n).Delete: Deletes the nth row.
- Selection.Delete: Deletes the currently selected rows.
- ActiveSheet.Rows.Delete: Deletes rows in the active sheet.
These commands help in different scenarios. Choose the one that fits your task.
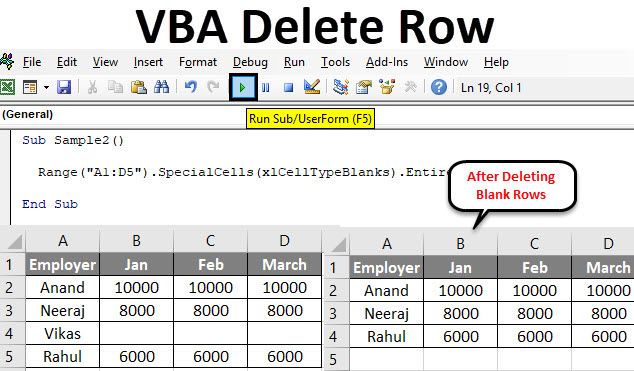
Below is an example to delete multiple rows:
Sub DeleteMultipleRows()
    Rows("3:5").Delete
End Sub
This code deletes rows three to five. Adjust the range based on your needs.
Using VBA to delete rows in Excel is powerful. Start with basic syntax and common commands. Soon, you’ll automate tasks efficiently.
Writing Your First Vba Script
Writing your first VBA script can seem difficult, but it is not. With simple steps, you can automate tasks in Excel. Today, we’ll show how to delete rows using VBA.
Creating A Module
To start, open Excel and press Alt + F11. This opens the VBA editor. In the editor, click Insert and then Module. A new module window will appear. This is where you’ll write your VBA code.
Basic Script To Delete Rows
Now, let’s write a basic script to delete rows. Copy and paste the following code into the module window:
Sub DeleteRows()
Dim lastRow As Long
Dim i As Long
lastRow = Cells(Rows.Count, 1).End(xlUp).Row
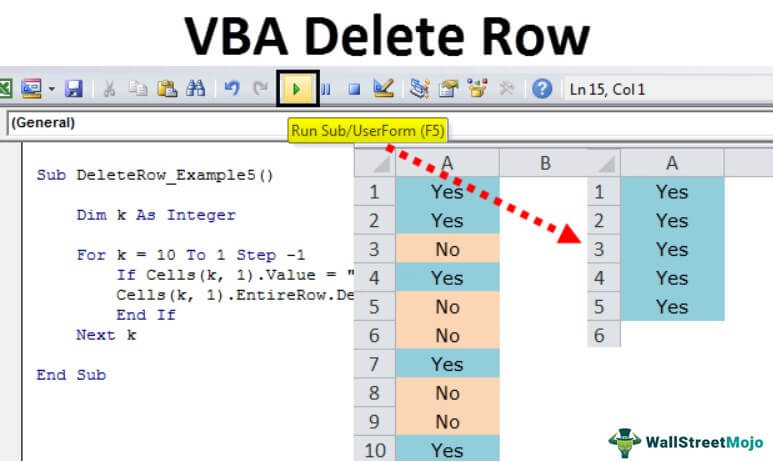
For i = lastRow To 1 Step -1
If Cells(i, 1).Value = "Delete" Then
Rows(i).Delete
End If
Next i
End Sub
This script deletes rows with the word “Delete” in the first column. Press F5 to run the script. Your rows will now be deleted.
Here’s a quick breakdown:
- Sub DeleteRows() starts the script.
- Dim lastRow As Long declares a variable for the last row.
- Dim i As Long declares a loop variable.
- lastRow = Cells(Rows.Count, 1).End(xlUp).Row finds the last row.
- For i = lastRow To 1 Step -1 starts a loop from the last row to the first row.
- If Cells(i, 1).Value = “Delete” Then checks if the cell value is “Delete”.
- Rows(i).Delete deletes the row if true.
- Next i moves to the next row.
- End Sub ends the script.
Using VBA to delete rows saves time and effort. Practice writing and running the script to understand it better.
Credit: www.wallstreetmojo.com
Advanced Row Deletion Techniques
Deleting rows in Excel using VBA can be simple and complex. Advanced techniques help manage large data sets efficiently. This section explores methods to delete rows based on criteria and using loops.
Deleting Rows Based On Criteria
Sometimes, you need to delete rows that meet specific criteria. For example, deleting rows where a certain column has a specific value. Here’s a VBA code snippet to achieve this:
Sub DeleteRowsBasedOnCriteria()
    Dim ws As Worksheet
    Dim lastRow As Long
    Dim i As Long
    Set ws = ThisWorkbook.Sheets("Sheet1")
    lastRow = ws.Cells(ws.Rows.Count, "A").End(xlUp).Row

    For i = lastRow To 1 Step -1
        If ws.Cells(i, 1).Value = "DeleteMe" Then
            ws.Rows(i).Delete
        End If
    Next i
End Sub
The code above deletes rows where the value in column A is “DeleteMe”. Adjust the column and value as needed.
Using Loops To Delete Multiple Rows
Deleting multiple rows one by one can be slow. Using loops can make the process faster. Below is a VBA code example for deleting multiple rows:
Sub DeleteMultipleRows()
    Dim ws As Worksheet
    Dim lastRow As Long
    Dim i As Long
    Set ws = ThisWorkbook.Sheets("Sheet1")
    lastRow = ws.Cells(ws.Rows.Count, "B").End(xlUp).Row

    For i = lastRow To 1 Step -1
        If ws.Cells(i, 2).Value = "" Then
            ws.Rows(i).Delete
        End If
    Next i
End Sub
This code deletes rows where column B is empty. Loops run from the last row to the first row to avoid skipping rows.
Error Handling In Vba
When working with VBA to delete rows in Excel, errors can happen. Error handling is crucial for a smooth experience. It helps identify and fix issues quickly.
Common Errors And Debugging
Errors can occur due to various reasons. Here are some common errors and how to debug them:
- Syntax Errors: These happen due to incorrect code structure. They are easy to spot.
- Runtime Errors: These occur while the code is running. They can be tricky to identify.
- Logical Errors: These are the hardest to find. The code runs but gives wrong results.
To debug errors, use the following steps:
- Check for typos or missing characters.
- Use breakpoints to pause code execution and inspect variables.
- Review the Immediate Window for error messages.
- Step through the code using F8 to find where it breaks.
Best Practices For Error Handling
Following best practices ensures your VBA code is robust and error-free. Here are some tips:
- Always use
On Error Resume Nextsparingly. It hides errors, making debugging hard. - Implement
On Error GoTostatements to direct the code to error-handling routines. - Use error-handling functions to log and display errors.
- Ensure your code cleans up resources, like closing files or database connections.
Here’s a sample code snippet for effective error handling:
Sub DeleteRows()
    On Error GoTo ErrorHandler
    ' Your code to delete rows
    Exit Sub
ErrorHandler:
    MsgBox "An error occurred: " & Err.Description
End Sub
By following these practices, your VBA code will be more reliable and easier to maintain.

Credit: stackoverflow.com
Testing And Running Your Script
After you have written your VBA script to delete rows in Excel, it’s crucial to test and run your script. This ensures that your code works as expected and doesn’t cause any unintended changes to your data. Follow these steps to execute and validate your script effectively.
Executing The Vba Script
To run your VBA script, follow these steps:
- Open your Excel workbook.
- Press Alt + F11 to open the VBA editor.
- Find your script in the Project Explorer.
- Click the green Run button or press F5.
Make sure you have saved your work before running the script. This helps you avoid losing any unsaved changes.
Validating Results
After running the script, you need to validate the results:
- Check if the correct rows have been deleted.
- Ensure no important data has been lost.
- Verify that the remaining data is intact.
If you find any issues, go back to your code. Make the necessary adjustments and run the script again. Repeat this process until you are satisfied with the results.
Optimizing Vba Performance
Optimizing VBA performance in Excel can save time and improve efficiency. This is crucial when working with large datasets. Below are some tips and techniques to enhance your VBA scripts.
Improving Script Efficiency
To improve script efficiency, follow these steps:
- Turn off Screen Updating: Use
Application.ScreenUpdating = Falseat the start. Turn it back on withApplication.ScreenUpdating = Trueat the end. - Disable Automatic Calculations: Set
Application.Calculation = xlCalculationManualbefore your code. Restore it withApplication.Calculation = xlCalculationAutomaticafter your code. - Avoid Selecting Cells: Directly reference cells instead of selecting them. For example, use
Range("A1").Value = "Hello"instead ofRange("A1").Selectfollowed bySelection.Value = "Hello".
Reducing Runtime
Reducing runtime is essential for handling large amounts of data. Here are a few strategies:
- Use Efficient Loops: Opt for
For Eachloops instead ofForloops when possible. - Limit the Range: Only work with the necessary range. For example, use
Range("A1:A1000")instead ofRange("A:A"). - Batch Updates: Make changes in batches. For example, collect changes in an array and write them all at once.
Here is a sample VBA code to delete rows efficiently:
Sub DeleteRows()
    Dim ws As Worksheet
    Dim rng As Range
    Set ws = ThisWorkbook.Sheets("Sheet1")
    Application.ScreenUpdating = False
    Application.Calculation = xlCalculationManual
    For Each rng In ws.Range("A1:A1000")
        If rng.Value = "Delete" Then
            rng.EntireRow.Delete
        End If
    Next rng
    Application.ScreenUpdating = True
    Application.Calculation = xlCalculationAutomatic
End Sub
By applying these techniques, you can significantly improve your VBA performance in Excel.
Real-world Applications
Deleting rows in Excel using VBA can streamline many tasks. This method is useful in various real-world scenarios. It helps automate repetitive tasks, saving time and reducing errors.
Case Studies
Many businesses have benefited from using VBA to delete rows. Here are a few examples:
| Company | Application | Outcome |
|---|---|---|
| ABC Corp | Removed duplicate rows in sales data | Increased data accuracy by 20% |
| XYZ Ltd | Cleared outdated inventory records | Saved 15 hours of manual work weekly |
| 123 Inc | Deleted rows with zero values in financial reports | Improved report readability and reduced file size |
Practical Scenarios
Here are some practical scenarios where deleting rows using VBA is beneficial:
- Data Cleaning: Remove rows with missing or invalid data.
- Inventory Management: Delete obsolete or zero-quantity inventory items.
- Sales Tracking: Erase duplicate or outdated sales entries.
- Financial Reporting: Remove rows with zero or irrelevant values.
Below is a simple VBA code to delete rows with zero values:
Sub DeleteZeroRows()
    Dim ws As Worksheet
    Dim rng As Range
    Dim i As Long

    Set ws = ThisWorkbook.Sheets("Sheet1")
    Set rng = ws.UsedRange

    For i = rng.Rows.Count To 1 Step -1
        If ws.Cells(i, 1).Value = 0 Then
            ws.Rows(i).Delete
        End If
    Next i
End Sub
This VBA code helps automate the task of deleting rows. It ensures data is clean and relevant.
Frequently Asked Questions
How Do I Delete Rows In Excel Using Vba?
To delete rows in Excel using VBA, you can use the `Rows` method. For example, `Rows(“1:3”). Delete` will delete rows 1 through 3.
Can Vba Delete Multiple Rows In Excel?
Yes, VBA can delete multiple rows. Use `Rows(“1:3”). Delete` to delete rows 1 to 3. Adjust as needed.
Is It Possible To Undo Vba Row Deletions?
No, VBA row deletions cannot be undone with Ctrl+Z. Always save your work before running VBA scripts.
How To Delete Rows Based On A Condition In Vba?
Use a loop with an `If` statement. For example, `If Cells(i, 1). Value = “Delete” Then Rows(i). Delete`.
Conclusion
Mastering VBA to delete rows in Excel can significantly boost your productivity. This guide simplifies the process for you. Practice the steps to gain confidence and improve your efficiency. Keep exploring VBA to unlock more powerful Excel functions. Stay tuned for more tips and tricks on Excel automation.