To split first and last names in Excel, use the “Text to Columns” feature. Select the column, then choose “Delimited” and set the space as the delimiter.
Excel is a powerful tool for managing data, including names. Sometimes, data entry results in names being combined into a single cell. This can make sorting and filtering more difficult. Fortunately, Excel offers a straightforward way to separate first and last names.
Using the “Text to Columns” feature simplifies this task. You can quickly split names by selecting the column, choosing the delimiter, and setting it to space. This method is efficient and saves you time when handling large datasets. With these steps, managing your data becomes easier and more organized.

Credit: m.youtube.com
Using Text To Columns
Splitting first and last names in Excel can be easy. One of the most effective methods is using the Text to Columns feature. This tool helps separate names quickly and efficiently. Let’s dive into how you can use this feature.
Accessing The Feature
To access the Text to Columns feature, follow these steps:
- Open your Excel spreadsheet.
- Select the column with the full names.
- Click on the Data tab in the ribbon.
- Find and click the Text to Columns button.
Step-by-step Guide
Follow this step-by-step guide to split the names:
- Select the column with full names.
- Click on Text to Columns under the Data tab.
- Choose Delimited and click Next.
- Select the Space checkbox as the delimiter.
- Click Next, then Finish.
After completing these steps, your names should be split into two columns. The first column will contain the first names. The second column will contain the last names. This method is fast and efficient.
Credit: ccp.com.au
Using Formulas
Excel provides powerful tools to manage data. Splitting first and last names is a common task. Using formulas can make this task easy and efficient.
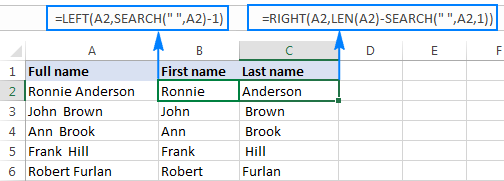
Left And Right Functions
The LEFT and RIGHT functions help extract text. Use LEFT to get the first name. Use RIGHT to get the last name.
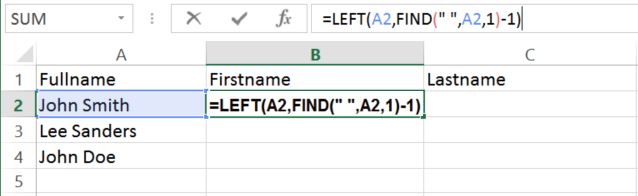
For example, if cell A1 contains “John Smith”:
- First Name:
=LEFT(A1, FIND(" ", A1)-1) - Last Name:
=RIGHT(A1, LEN(A1)-FIND(" ", A1))
Here, FIND locates the space. LEFT extracts the text before the space. RIGHT extracts the text after the space.
Find And Mid Functions
The FIND and MID functions also split names. FIND locates the space. MID extracts the text.
For example, if cell A1 contains “John Smith”:
- First Name:
=LEFT(A1, FIND(" ", A1)-1) - Last Name:
=MID(A1, FIND(" ", A1) + 1, LEN(A1))
Here, FIND locates the space. MID extracts the text after the space.
Splitting Names With Flash Fill
Splitting first and last names in Excel can be easy. Flash Fill is a powerful tool that helps with this task. It saves time and effort. Learn how to use Flash Fill effectively.
Activating Flash Fill
To activate Flash Fill, follow these steps:
- Open your Excel spreadsheet.
- Enter the first name in the cell next to the full name.
- Press Enter.
- Start typing the next first name. Excel will suggest the fill.
- Press Ctrl + E to accept the suggestion.
Example Scenarios
Here are some examples of how Flash Fill works:
| Full Name | First Name | Last Name |
|---|---|---|
| John Doe | John | Doe |
| Jane Smith | Jane | Smith |
| Michael Brown | Michael | Brown |
Flash Fill can detect patterns. It auto-fills the remaining cells. This makes splitting names quick and easy.
Advanced Techniques
Excel offers powerful features for data manipulation. Advanced techniques can make splitting names easier. These techniques are useful for complex datasets. Let’s explore some advanced methods.
Using Power Query
Power Query is a robust tool in Excel. It helps with data extraction and transformation. Follow these steps to split first and last names:
- Select the data range.
- Go to the Data tab.
- Click on Get & Transform Data.
- Select From Table/Range.
- In the Power Query Editor, select the column with names.
- Go to the Transform tab.
- Click on Split Column and choose By Delimiter.
- Select Space as the delimiter.
- Click OK.
Power Query will split the names into separate columns. You can now rename the columns as needed.
Handling Middle Names
Names with middle names can be tricky. You can still split them with some extra steps:
Assume you have names in the format First Middle Last. Follow these steps:
- Select the data range.
- Go to the Data tab.
- Click on Text to Columns.
- Select Delimited and click Next.
- Choose Space as the delimiter.
- Click Finish.
Excel will split the names into three columns. You may need to adjust for names without middle names. Use the IF function to handle these cases.
| Original Name | First Name | Middle Name | Last Name |
|---|---|---|---|
| John A Doe | John | A | Doe |
| Jane Doe | Jane | Doe |
For more complex names, consider using Power Query again. It offers more flexibility and control.
Dealing With Edge Cases
Dealing with edge cases while splitting first and last names in Excel can be tricky. Special cases like titles and hyphenated last names require extra attention. Let’s explore these scenarios.
Names With Titles
Names with titles add complexity to splitting names in Excel. Titles like “Dr.”, “Mr.”, or “Mrs.” need special handling. Here’s a step-by-step guide:
- Create a new column to store the title.
- Use the following formula to extract the title:
=IF(OR(LEFT(A2,3)="Dr.", LEFT(A2,3)="Mr.", LEFT(A2,4)="Mrs."), LEFT(A2, FIND(" ", A2)-1), "")This formula checks if the name starts with a title. It then extracts the title.
- To extract the first name, use:
=IF(B2<>"", MID(A2, FIND(" ", A2)+1, FIND(" ", A2, FIND(" ", A2)+1)-FIND(" ", A2)), LEFT(A2, FIND(" ", A2)-1))This formula considers if there’s a title. It extracts the first name accordingly.
- For the last name, use:
=IF(B2<>"", MID(A2, FIND(" ", A2, FIND(" ", A2)+1)+1, LEN(A2)), MID(A2, FIND(" ", A2)+1, LEN(A2)))This formula handles the last name extraction considering the title.
Hyphenated Last Names
Hyphenated last names can also pose a challenge. They need careful treatment to avoid splitting. Follow these steps:
- Use the following formula to extract the first name:
=LEFT(A2, FIND(" ", A2)-1)This formula extracts the first name before the first space.
- To handle the hyphenated last name, use:
=MID(A2, FIND(" ", A2)+1, LEN(A2))This formula extracts everything after the first space, preserving the hyphen.
For more control, you can also use the Text to Columns feature in Excel.
- Select the column with names.
- Go to Data > Text to Columns.
- Choose Delimited and click Next.
- Select Space and click Finish.
This method splits names into separate columns but keep an eye on hyphenated names.
Handling these edge cases ensures your data remains accurate and usable.
Credit: www.ablebits.com
Automating The Process
Splitting first and last names manually can take time. Automating this process in Excel helps save time. It also reduces the chance of mistakes. We will explore two methods: Creating Macros and Using VBA.
Creating Macros
Macros automate tasks in Excel. Follow these steps to create a macro for splitting names:
- Open Excel and press Alt + F11 to open the VBA editor.
- Click on Insert and then Module.
- Copy and paste the following code into the module:
Sub SplitNames()
    Dim LastName As String
    Dim FirstName As String
    Dim FullName As String
    Dim i As Integer
    i = 1
    Do While Cells(i, 1).Value <> ""
        FullName = Cells(i, 1).Value
        LastName = Split(FullName, " ")(1)
        FirstName = Split(FullName, " ")(0)
        Cells(i, 2).Value = FirstName
        Cells(i, 3).Value = LastName
        i = i + 1
    Loop
End Sub
Now, run the macro by pressing F5. The first and last names will be split into separate columns.
Using Vba
VBA, or Visual Basic for Applications, is powerful. It allows more flexibility in Excel. Here’s how to use VBA to split names:
- Press Alt + F11 to open the VBA editor.
- Click on Insert and then Module.
- Enter the following code:
Sub SplitNamesVBA()
    Dim ws As Worksheet
    Set ws = ActiveSheet
    Dim fullName As String
    Dim firstName As String
    Dim lastName As String
    Dim i As Integer
    i = 1
    Do While ws.Cells(i, 1).Value <> ""
        fullName = ws.Cells(i, 1).Value
        firstName = Split(fullName, " ")(0)
        lastName = Split(fullName, " ")(1)
        ws.Cells(i, 2).Value = firstName
        ws.Cells(i, 3).Value = lastName
        i = i + 1
    Loop
End Sub
After entering the code, press F5 to run it. The VBA script will split the names into two columns.
Frequently Asked Questions
How Do I Split A Full Name In Excel?
To split a full name, use Excel’s “Text to Columns” feature. Select the column, go to “Data,” then “Text to Columns. ” Choose “Delimited,” then select space as the delimiter.
Can I Split Names In Excel Using Formulas?
Yes, you can use formulas. Use the LEFT, RIGHT, FIND, and LEN functions to extract first and last names from a full name cell.
What Is The Text To Columns Feature In Excel?
The “Text to Columns” feature helps split data in one column into multiple columns. It’s useful for separating names, addresses, and more.
How Do I Split Names Using Flash Fill?
Type the first name in the adjacent cell, then start typing the next one. Excel’s “Flash Fill” will suggest the rest. Press “Enter” to accept.
Conclusion
Splitting first and last names in Excel is simple with the right steps. Use the Text to Columns feature or formulas. Both methods save time and reduce errors. Now you can effortlessly manage your data. Master these techniques and improve your Excel skills today.