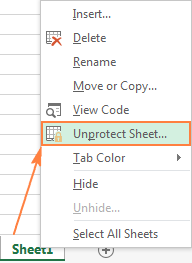
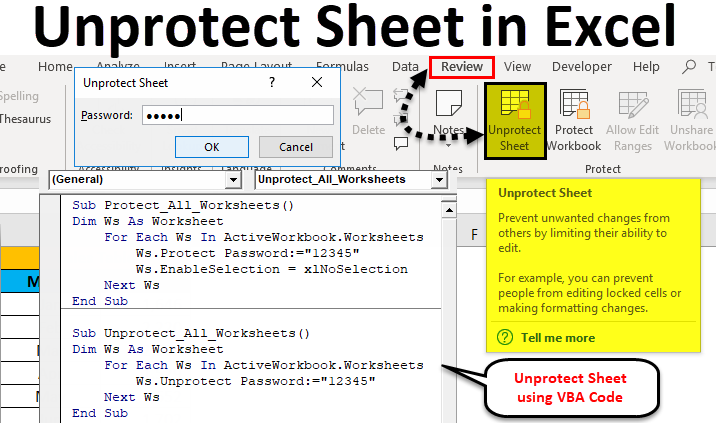
To unprotect a sheet in Excel, go to the ‘Review’ tab and click ‘Unprotect Sheet’. Enter the password if prompted.
Unprotecting a sheet in Excel allows users to edit locked cells and make changes to the worksheet. This feature is useful for collaborative work where multiple users need to update data. It is important to note that unprotecting a sheet does not remove any existing data or formulas.
Instead, it grants permission for modifications. Users should always ensure they have the correct password, if one is set, to avoid any inconvenience. The process is simple and can be done in just a few clicks, making it a convenient tool for managing workbook security and accessibility.

Credit: www.ablebits.com
Preparation
Preparation is key before you unprotect an Excel sheet. Follow these steps to ensure a smooth process. This section will guide you through essential preparations, including backing up your data and checking for password protection.
Backup Your Data
Always backup your data before making any changes. This step is crucial to avoid data loss. Create a copy of your Excel file. Follow these simple steps:
- Open the Excel file you want to unprotect.
- Click on File in the top menu.
- Select Save As from the dropdown menu.
- Choose a different location or rename the file.
- Click Save to create a backup.
Now you have a safe copy of your original data.
Check For Password Protection
It’s important to check for password protection on your Excel sheet. Follow these steps:
- Open the Excel file.
- Select the sheet you want to unprotect.
- Go to the Review tab in the ribbon.
- Look for the Unprotect Sheet button.
If the button is clickable, the sheet is password protected. If not, the sheet is already unprotected.
If the sheet is password protected, you will need the password. Enter the password when prompted.
These preparations ensure your data stays safe and your process is smooth.
Basic Methods
Unlocking an Excel sheet is simple. Use Excel’s built-in features or remove password protection. Here, we explain the basic methods step-by-step.
Using Excel’s Built-in Feature
Excel has a built-in feature for unprotecting sheets. Follow these easy steps:
- Open your Excel file.
- Navigate to the Review tab.
- Click on Unprotect Sheet.
- If prompted, enter the password.
This method is quick and straightforward. It works if you know the password.
Removing Password Protection
Forgot the password? You can still unlock the sheet. Use these steps:
- Open the Excel file.
- Press Alt + F11 to open the VBA editor.
- Click on Insert and select Module.
- Paste the following code:
Sub UnprotectSheet()
    Dim ws As Worksheet
    For Each ws In ActiveWorkbook.Worksheets
        ws.Unprotect Password:=""
    Next ws
End Sub
- Press F5 to run the code.
The sheet will now be unprotected. This method works without knowing the password.
Advanced Techniques
Excel sheets often come with password protection. This feature keeps data safe. But what if you need to unprotect a sheet? Advanced techniques can help. These methods include using VBA code and third-party tools.
Using Vba Code
VBA stands for Visual Basic for Applications. It’s a powerful tool in Excel. You can use VBA code to unprotect a sheet.
First, press Alt + F11 to open the VBA editor. Then, insert a new module. Copy and paste the following code:
Sub UnprotectSheet()
    Dim ws As Worksheet
    For Each ws In ActiveWorkbook.Worksheets
        ws.Unprotect Password:="password"
    Next ws
End Sub
Replace “password” with your actual password. Run the code by pressing F5. Your sheet should be unprotected now.
Third-party Tools
Third-party tools can also unprotect Excel sheets. These tools are user-friendly. Many are available online for free.
Excel Password Recovery Lastic is one such tool. It supports various Excel versions. It also has a high success rate.
| Tool Name | Features |
|---|---|
| Excel Password Recovery Lastic |
|
| PassFab for Excel |
|
Use these advanced techniques to unprotect your Excel sheets. Choose the method that suits your needs best.

Credit: www.educba.com
Troubleshooting
Experiencing issues with unlocking an Excel sheet? You are not alone. Excel’s Unprotect Sheet feature can sometimes present challenges. These issues can be frustrating, but they are solvable. This section will guide you through some common troubleshooting steps.
Forgotten Passwords
Forgetting a password can be a common problem. Here are some methods to overcome it:
- Use Password Recovery Software: Many tools can help you recover forgotten passwords.
- VBA Code: You can use Visual Basic for Applications (VBA) code to unlock your sheet. Below is an example of VBA code to unprotect a sheet:
Sub UnprotectSheet() Dim i As Integer, j As Integer, k As Integer On Error Resume Next For i = 65 To 66: For j = 65 To 66: For k = 65 To 66 ActiveSheet.Unprotect Chr(i) & Chr(j) & Chr(k) If ActiveSheet.ProtectContents = False Then MsgBox "Password is " & Chr(i) & Chr(j) & Chr(k) Exit Sub End If Next k, j, i End Sub - Contact the Creator: Ask the person who created the sheet for the password.
Corrupted Files
Corrupted Excel files can be a headache. Here are some steps to fix corrupted files:
- Open and Repair: Use Excel’s built-in feature to repair corrupted files.
- Copy Data to a New File: If the file opens, copy the data to a new workbook.
- Use Third-Party Tools: There are specialized tools designed to repair corrupted Excel files.
Here is a simple table that outlines the steps for using Excel’s Open and Repair feature:
| Step | Description |
|---|---|
| 1 | Open Excel and go to File > Open. |
| 2 | Select the corrupted file. |
| 3 | Click the arrow next to the Open button and select Open and Repair. |
| 4 | Choose Repair to recover as much of the file as possible. |
These steps can help you recover your important data.
Security Considerations
Excel sheets are powerful tools for data management and analysis. Yet, keeping them secure is crucial. Unprotected sheets can expose sensitive information and disrupt workflows. This section dives into the security considerations of unprotected Excel sheets.
Risks Of Unprotected Sheets
Unprotected sheets are vulnerable to unauthorized access. This can lead to data tampering. Imagine someone altering financial records without permission. The consequences can be severe.
Another risk is the potential for data loss. Users may accidentally delete important information. Without protection, the loss is irreversible. Additionally, unprotected sheets can be a gateway for malware. Hackers can embed malicious code in them.
Best Practices
Implementing best practices can mitigate these risks. Use these tips to protect your Excel sheets:
- Use Strong Passwords: Ensure your password is complex. Combine letters, numbers, and symbols.
- Regularly Update Passwords: Change passwords periodically. This reduces the risk of unauthorized access.
- Limit Access: Only share the sheet with trusted users. Restrict permissions to read-only when possible.
- Enable Encryption: Encrypt your Excel files. This adds an extra layer of security.
- Backup Regularly: Keep backups of important sheets. This ensures data recovery if needed.
Implementing these practices protects your data. It ensures only authorized changes and access.
Automation Tips
Automation Tips can save you hours when working with Excel sheets. Unlocking protected sheets manually can be a tedious task. With automation, you can simplify this process and enhance productivity.
Creating Macros
Macros can automate repetitive tasks in Excel. They are small programs you create to perform specific actions.
To create a macro to unprotect a sheet, follow these steps:
- Open Excel and press ALT + F11 to open the VBA editor.
- Click Insert and then select Module.
- Type the following code into the module:
Sub UnprotectSheet() ActiveSheet.Unprotect Password:="yourpassword" End Sub - Close the VBA editor and return to your Excel sheet.
- Press ALT + F8 to open the Macro dialog box.
- Select UnprotectSheet and click Run.
Streamlining The Process
Automating the unprotect sheet process can save time. You can streamline this by assigning the macro to a button. This way, you can unprotect your sheet with one click.
To assign a macro to a button:
- Click the Developer tab in Excel.
- Click Insert and select the Button option.
- Draw the button on your sheet.
- In the Assign Macro dialog box, select UnprotectSheet.
- Click OK. Now, clicking the button will run the macro.
By automating tasks, you can focus on more important work. This increases efficiency and reduces errors.
:max_bytes(150000):strip_icc()/001-how-to-unprotect-excel-workbooks-4691837-3a97c2e1474c45e8a6a8175b2222307a.jpg)
Credit: www.lifewire.com
Frequently Asked Questions
How Do I Unprotect An Excel Sheet?
To unprotect an Excel sheet, go to the “Review” tab. Click “Unprotect Sheet. ” Enter the password if prompted.
Can I Unprotect Excel Without A Password?
No, you cannot unprotect an Excel sheet without the password. You’ll need the correct password to unlock it.
Why Can’t I Unprotect My Excel Sheet?
You can’t unprotect your Excel sheet if you don’t have the correct password. Ensure you’re entering the right password.
What Is The Shortcut To Unprotect Excel?
There is no direct shortcut to unprotect an Excel sheet. Use the “Review” tab and click “Unprotect Sheet. “
Conclusion
Unlocking an Excel sheet is simple and efficient. Follow the steps outlined for quick results. Protect your data by reapplying protection when needed. Mastering these techniques can enhance your productivity. Stay informed with more Excel tips and tricks to make your tasks easier and more efficient.


