
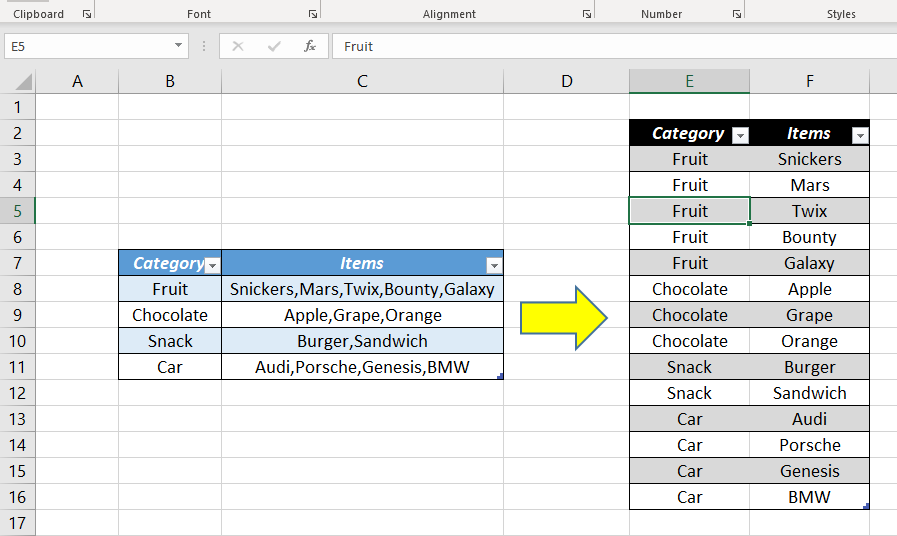
To separate values in a cell into rows in Excel, use the “Text to Columns” feature and the “Transpose” function. This process helps in organizing data efficiently.
Excel users often need to manage large datasets. Sometimes, values in a single cell need to be split into multiple rows for better analysis. This task can seem daunting but is quite manageable with Excel’s built-in features. The “Text to Columns” tool divides cell contents based on delimiters such as commas or spaces.
After splitting, the “Transpose” function rearranges these values into rows. This method enhances data readability and usability, making it easier to analyze and interpret. Mastering this technique can significantly improve your data management skills in Excel.
Preparing Your Data
Before separating values in Excel, it’s crucial to prepare your data. Preparing your data ensures accurate results and a clean spreadsheet. This process includes cleaning up input data and identifying delimiters.
Cleaning Up Input Data
Start by checking your spreadsheet for any inconsistencies. Remove any extra spaces, incorrect entries, and duplicate values.
Use the TRIM function to remove any leading or trailing spaces. This function helps keep your data clean and consistent.
Also, make sure all cells contain the expected data type. For example, dates should be in date format, and numbers should be in number format.
If needed, you can use the Find and Replace feature to correct common errors. This feature is useful for replacing unwanted characters or correcting misspellings.
Identifying Delimiters
Identify the delimiters used in your data. Delimiters are the characters that separate your values. Common delimiters include commas, semicolons, and spaces.
To identify your delimiter, look at your data. For example, if your data looks like “apple, orange, banana,” then the delimiter is a comma.
Sometimes, you may have multiple delimiters. For example, “apple; orange, banana” uses both a semicolon and a comma.
Keep in mind, Excel allows for custom delimiters. You can use any character that isn’t part of your data values. Ensure your chosen delimiter is consistent throughout your data.
Once you identify your delimiters, you are ready to separate values into rows.
Using Text To Columns
Excel’s Text to Columns feature is a powerful tool. It helps you split data in a cell into multiple columns. This feature is useful for managing and organizing data.
Accessing Text To Columns
First, you need to select the cells with the data. Then, go to the Data tab on the Ribbon. Click on the Text to Columns button. A Convert Text to Columns Wizard will appear.
Splitting Data Into Columns
The wizard has three steps. In the first step, select the Delimited option. Click Next to proceed. In the second step, choose the delimiters that separate your data. Common delimiters include comma, semicolon, and space. After selecting, click Next.
In the third step, you can set the data format for each column. Choose General, Text, or Date. Click Finish to complete the process.
Here is a simple example:
| Original Data | Split Data |
|---|---|
| John, Doe, 30 | John | Doe | 30 |
Using Text to Columns can make data handling much easier. It helps you organize and analyze data efficiently.
Transposing Data
Transposing data involves switching the orientation of your data. This means converting rows into columns or vice versa. This technique is essential for better data organization. It helps in data analysis and presentation. Let’s dive into how to transpose data in Excel.
Copying Split Data
First, you need to copy the data you want to transpose. Select the cells containing the split data. Use Ctrl + C to copy the data. Ensure all the necessary cells are highlighted. This will prepare your data for transposing.
Using Paste Special
Next, click on the destination cell where you want to paste the transposed data. Right-click and select Paste Special. A dialog box will appear. Check the Transpose option in the dialog box. Click OK to paste the transposed data.
Here’s a step-by-step table to make it easier:
| Step | Action | Shortcut |
|---|---|---|
| 1 | Select the data you want to transpose | |
| 2 | Copy the selected data | Ctrl + C |
| 3 | Click on the destination cell | |
| 4 | Right-click and choose Paste Special | |
| 5 | Check the Transpose option | |
| 6 | Click OK |
Using these steps, you can easily transpose data in Excel. This method is quick and efficient. It helps in reorganizing your data for better analysis.

Credit: answers.microsoft.com
Using Power Query
Using Power Query in Excel makes it simple to split values in a cell into rows. This powerful tool automates the process, saving time and reducing errors.
Loading Data Into Power Query
Begin by loading your data into Power Query. Follow these steps:
- Select the data range in your Excel sheet.
- Go to the Data tab on the ribbon.
- Click From Table/Range.
- Ensure the Create Table dialog box is correct and click OK.
Your data will now appear in the Power Query Editor.
Splitting Columns By Delimiter
To split a column by a delimiter, follow these steps:
- Click on the column header you want to split.
- Go to the Home tab in the Power Query Editor.
- Select Split Column in the Transform group.
- Choose By Delimiter from the drop-down menu.
A dialog box will appear with split options. Choose the delimiter that separates your values, then click OK.
Power Query will split your values into separate columns. To convert these columns into rows:
- Select the columns to be converted.
- Click Unpivot Columns under the Transform tab.
- Adjust the resulting data as needed.
Finally, load the modified data back to Excel. Click Close & Load in the Home tab of the Power Query Editor.
Using Power Query in Excel allows you to efficiently split cell values into rows.
Automating With Vba
Excel offers many ways to automate tasks. One powerful method is using VBA. VBA helps to simplify repetitive tasks. You can separate values in a cell into rows with VBA. Let’s explore how to set this up and write the code.
Setting Up Vba Environment
First, you need to access the VBA editor. Follow these steps:
- Open Excel and press Alt + F11 to open the VBA editor.
- In the editor, click Insert and select Module.
- A new module window will appear. This is where you will write your code.
Ensure you save your work frequently. This avoids losing any progress.
Writing The Vba Code
Now, let’s write the VBA code. The code will separate values in a cell into rows. Copy and paste the code below into your module window:
Sub SplitValuesIntoRows()
    Dim cell As Range
    Dim valueArray() As String
    Dim i As Integer
    Dim destinationRow As Integer

    destinationRow = 1

    For Each cell In Selection
        valueArray = Split(cell.Value, ",")

        For i = LBound(valueArray) To UBound(valueArray)
            Cells(destinationRow, cell.Column).Value = Trim(valueArray(i))
            destinationRow = destinationRow + 1
        Next i

    Next cell
End Sub
Here is what the code does:
- Sub SplitValuesIntoRows(): Starts the subroutine.
- Dim: Declares variables.
- destinationRow: Sets the starting row.
- For Each cell In Selection: Loops through each selected cell.
- valueArray = Split(cell.Value, “,”): Splits cell values by commas.
- For i = LBound(valueArray) To UBound(valueArray): Loops through the array.
- Cells(destinationRow, cell.Column).Value = Trim(valueArray(i)): Writes values to cells.
- Next i: Moves to the next item in the array.
- Next cell: Moves to the next cell.
- End Sub: Ends the subroutine.
Run the code by pressing F5 or clicking the Run button. Select the range of cells you want to process first.
Handling Large Datasets
Handling large datasets in Excel can be challenging. When you need to separate values in a cell into rows, it gets even trickier. This task requires careful management of resources to ensure smooth performance. This section will guide you through optimizing Excel performance and using external tools effectively.
Optimizing Excel Performance
When working with large datasets, Excel’s performance can slow down. Here are some tips to keep it running smoothly:
- Use Efficient Formulas: Avoid volatile functions like
NOW()andRAND(). Use simple and direct formulas. - Limit Conditional Formatting: Too many rules can slow Excel. Use sparingly.
- Minimize Data: Keep only necessary data in your worksheet. Remove duplicates and irrelevant data.
- Use Filters and Pivot Tables: These tools help manage and analyze data without overloading the system.
Using External Tools
Sometimes, Excel alone is not enough for large datasets. External tools can help:
- Power Query: This Excel add-on allows for advanced data manipulation. It can handle large datasets efficiently.
- VBA Macros: Write custom macros to automate repetitive tasks. This saves time and reduces errors.
- Third-Party Software: Tools like Alteryx and Tableau offer powerful data processing capabilities. They can handle datasets that Excel struggles with.
By following these tips and using the right tools, you can manage large datasets in Excel more effectively. This ensures that your data is organized, accessible, and ready for analysis.
Credit: xlncad.com
Frequently Asked Questions
How Do I Split A Cell Into Rows In Excel?
To split a cell into rows, use the “Text to Columns” feature and then transpose the data using “Paste Special. “
Can I Separate Values In A Single Cell?
Yes, you can separate values using Excel functions like “Text to Columns” or “Flash Fill. “
What Is The Text To Columns Feature?
The “Text to Columns” feature splits cell content based on a delimiter like a comma or space.
How Do I Use Flash Fill In Excel?
Type the desired split pattern in adjacent cells, then use “Flash Fill” to auto-complete the pattern.
Conclusion
Mastering how to separate values in Excel cells into rows can boost your productivity. This skill simplifies data management and enhances efficiency. Practice these steps to streamline your workflow. Excel users will find this technique invaluable for organizing and analyzing data.
Keep exploring Excel features to maximize your potential.