
Use the TEXT function to separate the date in Excel. Apply =TEXT(A1, “MM/DD/YYYY”) in a cell to reformat.
Excel is a powerful tool for managing data, and working with dates is no exception. Whether you need to extract the month, day, or year from a date, Excel provides robust formulas to accomplish this. The TEXT function is particularly useful for reformatting and separating date components into distinct columns.
By mastering these simple formulas, you can make date management in Excel far more efficient and streamlined. This knowledge is essential for anyone dealing with large datasets or complex data analysis. With just a few clicks and the right formula, you can transform how you handle dates in Excel.
Prerequisites
To separate dates in Excel using a formula, certain prerequisites must be met. Understanding these basics ensures smooth execution of the task.
Basic Excel Knowledge
Before diving into date separation, you should have some basic Excel knowledge. This includes:
- Understanding cell references
- Knowing how to enter data into cells
- Familiarity with Excel functions like
=TEXT()and=DATE()
These skills help you use formulas effectively. You must also be comfortable navigating Excel’s interface.
Excel Version Requirements
Excel versions differ in features. Ensure you have a compatible version. Generally, Excel 2010 and later support date functions.
| Excel Version | Compatibility |
|---|---|
| Excel 2010 | Compatible |
| Excel 2013 | Compatible |
| Excel 2016 | Compatible |
| Excel 2019 | Compatible |
| Excel 365 | Compatible |
Older versions may lack some functions. Ensure your Excel is up-to-date for best results.

Credit: www.statology.org
Using Text To Columns
Excel is a powerful tool for data management. One useful feature is the Text to Columns option. This feature helps you to separate date into different columns. It makes data analysis easier and more efficient.
Navigating To Text To Columns
To start, open your Excel file. Select the column that contains the dates you want to separate. Go to the toolbar at the top.
Click on the Data tab. You will see a group of options. Look for the Text to Columns button. Click on it to open the wizard.
Step-by-step Process
Once you click on Text to Columns, a wizard will appear. Follow these steps:
- Select the Delimited option. Click Next.
- Choose the delimiter that separates your date parts. For dates, this is usually a slash (/) or hyphen (-).
- Click Next again. You will see a preview of how your data will look.
- Choose the destination for your separated data. Click Finish.
Your dates should now be separated into different columns. This makes it easier to sort and analyze your data. If you have multiple date formats, you may need to repeat the process.
Here is a quick summary in a table format:
| Step | Action |
|---|---|
| 1 | Select the Delimited option. Click Next. |
| 2 | Choose the delimiter (slash or hyphen). Click Next. |
| 3 | Review the preview. Click Next. |
| 4 | Choose the destination. Click Finish. |
Following these steps will help you manage your date data effectively. The Text to Columns feature is useful for many tasks. It is worth learning if you work with dates in Excel.
Using Excel Formulas
Excel is an amazing tool for managing data. One of its powerful features is the ability to work with dates. Separating dates in Excel can be very useful. It helps in organizing data better. This post will show you how to do it using formulas.
Introduction To Date Formulas
Excel provides several formulas to handle dates. These formulas can extract day, month, and year from a date. Let’s explore these handy formulas.
Step-by-step Formula Guide
Follow these steps to separate date components:
- Open your Excel sheet with date data.
- Click on the cell where you want the day to appear.
- Enter the formula:
=DAY(A1) - Press Enter. The day will appear in the selected cell.
- For the month, click on another cell.
- Enter the formula:
=MONTH(A1) - Press Enter. The month will show in that cell.
- Finally, for the year, click on another cell.
- Enter the formula:
=YEAR(A1) - Press Enter. The year will be displayed.
Formulas At A Glance
| Component | Formula |
|---|---|
| Day | =DAY(A1) |
| Month | =MONTH(A1) |
| Year | =YEAR(A1) |
Using these simple formulas, you can easily separate date components. This makes your data more organized and easier to analyze.
Credit: excelchamps.com
Extracting Day
Extracting the day from a date in Excel is very useful. You might need to analyze data based on days. Excel makes this task simple with built-in functions. Let’s explore how to do this using the DAY function.
Using Day Function
The DAY function in Excel extracts the day from a date. This function returns a number between 1 and 31. The syntax for the DAY function is:
=DAY(serial_number)Here, serial_number is the date from which you want to extract the day.
Let’s see an example. Suppose you have a date in cell A1. To extract the day, you would use:
=DAY(A1)
Examples And Practice
Consider the following table of dates:
| Date | Extracted Day |
|---|---|
| 01/15/2023 | =DAY(A2) |
| 07/04/2023 | =DAY(A3) |
| 12/25/2023 | =DAY(A4) |
In this table:
- Date column contains the original dates.
- Extracted Day column shows the formula to extract the day.
Enter these dates in cells A2, A3, and A4. Then, enter the formulas in the corresponding cells in the Extracted Day column.
Practice these steps:
- Enter a date in a cell.
- Use the
DAYfunction to extract the day. - Check the result to ensure accuracy.
By following these steps, you can easily extract the day from any date in Excel.
Extracting Month
Extracting the month from a date in Excel can simplify data analysis. Whether you have a large dataset or a single date, knowing how to extract the month is essential. This guide will show you how to use the MONTH function effectively.
Using Month Function
The MONTH function in Excel extracts the month from a date. It returns a number between 1 and 12, representing the month.
Here’s the basic syntax:
=MONTH(date)
The date can be a cell reference or a date entered directly.
Examples And Practice
Let’s look at some examples to understand better:
| Date | Formula | Result |
|---|---|---|
| 01/15/2023 | =MONTH(“01/15/2023”) | 1 |
| 07/20/2023 | =MONTH(A2) | 7 |
| 12/31/2023 | =MONTH(“12/31/2023”) | 12 |
Practice these examples to master the function:
- Enter a date in cell A1.
- In cell B1, type
=MONTH(A1). - Press Enter and see the month extracted.
Using the MONTH function can speed up data processing. It makes month-based analysis easier and more efficient.
Extracting Year
Want to extract the year from a date in Excel? It’s easy! Excel has a special function to do this. This blog post will show you how.
Using Year Function
The YEAR function in Excel is very useful. It helps you get the year from any date. Just use the formula =YEAR(date).
Here is a simple guide:
- Click on the cell where you want the year.
- Type the formula
=YEAR(A1)if your date is in cell A1. - Press Enter. The year from the date will appear.
You can use this method for any date in Excel. It works very quickly and saves time.
Examples And Practice
Let’s look at some examples to understand better:
| Date | Formula | Year Extracted |
|---|---|---|
| 12/25/2022 | =YEAR(A1) | 2022 |
| 07/04/2021 | =YEAR(A2) | 2021 |
| 01/01/2020 | =YEAR(A3) | 2020 |
Try practicing with the dates above. Use different dates to get more comfortable.
Remember, the YEAR function is your friend. It makes extracting years easy and quick.
Combining Date Parts
Combining different parts of a date in Excel is useful. You might need this for many reasons. Maybe you want to create a custom date format. Or you need to display dates in a specific way. Let’s explore how to combine date parts using formulas.
Concatenation Techniques
Concatenation joins different parts into one string. In Excel, you can use the CONCATENATE function or the & operator. Here’s a simple example:
| Year | Month | Day | Combined Date |
|---|---|---|---|
| 2023 | 10 | 05 | =CONCATENATE(A2, “-“, B2, “-“, C2) |
This formula will output 2023-10-05. You can also use the & operator:
=A2 & "-" & B2 & "-" & C2This also produces the same result.
Practical Applications
Combining date parts can be very useful. Here are some practical applications:
- Custom Reports: Create reports with dates in specific formats.
- Data Analysis: Combine dates for easier analysis.
- Database Management: Store dates in a consistent format.
Let’s see an example. You have separate columns for Year, Month, and Day. You want to create a date in the format MM/DD/YYYY. Use this formula:
=TEXT(B2,"00") & "/" & TEXT(C2,"00") & "/" & A2This will produce 10/05/2023.
Combining date parts in Excel is powerful and flexible. It helps in creating custom date formats. Use these techniques to make your data work better for you.

Credit: www.extendoffice.com
Troubleshooting
Separating dates in Excel using formulas can sometimes be tricky. Errors may occur due to incorrect formulas or unexpected data formats. This section will help you troubleshoot common errors and provide useful tips and tricks.
Common Errors
Errors can happen when separating dates in Excel. Here are some common ones:
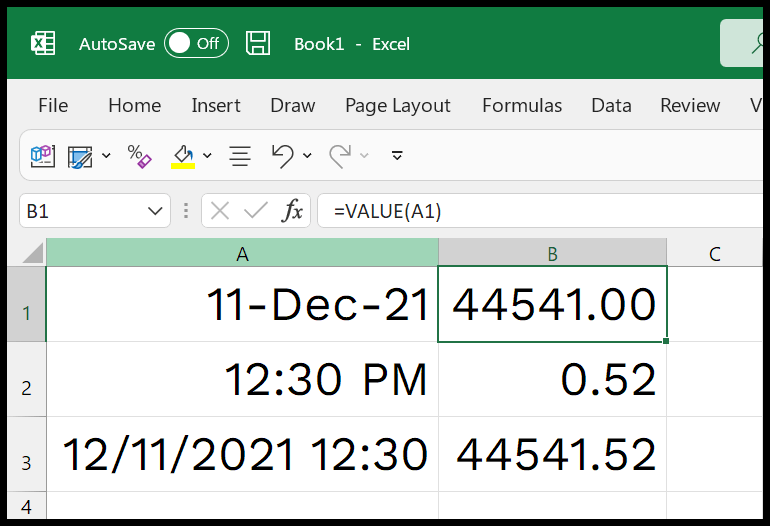
- #VALUE! Error: This error occurs if the cell contains text instead of a date.
- Incorrect Date Format: The date might be in a format Excel doesn’t recognize.
- Formula Errors: Mistakes in the formula syntax can lead to errors.
Tips And Tricks
To avoid and fix these errors, follow these tips:
- Check Date Format: Ensure dates are in a format Excel understands.
- Use the Correct Formula: Double-check your formulas for accuracy.
- Convert Text to Date: Use the DATEVALUE function to convert text dates.
Here is a table to help you with common formulas:
| Function | Purpose | Example |
|---|---|---|
| YEAR | Extract the year from a date | =YEAR(A1) |
| MONTH | Extract the month from a date | =MONTH(A1) |
| DAY | Extract the day from a date | =DAY(A1) |
| DATEVALUE | Convert text to a date | =DATEVALUE("01/01/2023") |
Frequently Asked Questions
How Do You Separate Date In Excel?
Use the TEXT function to extract day, month, and year from a date.
What Formula Separates Day From Date In Excel?
Use =DAY(A1) to extract the day from a date in cell A1.
How To Extract Month From A Date?
Use =MONTH(A1) to extract the month from a date in cell A1.
Which Formula Extracts Year From A Date?
Use =YEAR(A1) to extract the year from a date in cell A1.
Can You Split Date Into Separate Columns?
Yes, use TEXT functions or Text to Columns feature.
What Is Text To Columns In Excel?
Text to Columns splits data into multiple columns based on delimiters like spaces or commas.
Conclusion
Mastering date separation in Excel is essential for effective data management. Use these formulas to streamline your workflow. Practicing these techniques will enhance your Excel skills and boost productivity. Keep experimenting with different formulas to find the best fit for your needs.
Happy Excel-ing!